Sharepoint Is Open in Another Application Please Close It and Try Again
File is open in another program error [Total Guide]
Updated: Posted: July 2020
- Stuck on The action cannot be completed because the file is open in another plan?
- We know this error can be frustrating, that's why we've gathered all the possible fixes to aid yous get rid of it.
- Swoop deeper into file related errors and take appropriate measures with the help of your File Explorer Guides.
- Team upward with our Windows 10 Errors Hub and take your troubleshooting skills to the next level.
XINSTALL By CLICKING THE DOWNLOAD FILE
Computer errors can occur sooner or after on any PC, and while some are relatively harmless, others will preclude y'all from accessing files or performing certain tasks.
One of these errors is The activeness cannot be completed because the file is open in another plan and today we're going to testify you how to fix it on Windows 10.
How to set up The activeness cannot be completed because the file is open in another program error?
1. Use Deejay Cleanup and repair HDD
In some cases, this problem can be caused by thumbnails, but y'all might be able to fix it by removing them. The easiest way to do that is to delete them with Disk Cleanup. To remove your thumbnails, exercise the following:
- Printing Windows Fundamental + S and enter disk cleanup and select Disk Cleanup from the card.

- Select your organization drive, by default it should exist C: and click on OK.

- Your PC will now browse the bulldoze. This process can take a while depending on the size of your partition, so exist patient.
- In one case the scan is complete you'll see a list of options. Select Thumbnails and click OK.
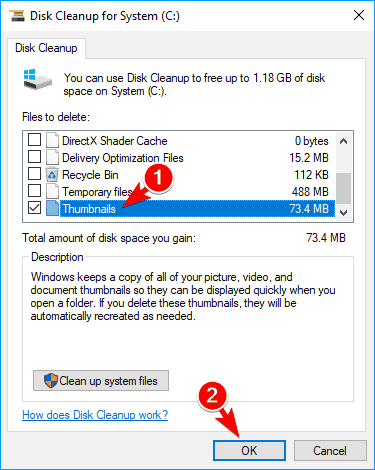
- Wait while Disk Cleanup removes the selected files.
After removing the thumbnails using Disk Cleanup the problem volition exist fixed. If the effect appears once more yous might need to repeat this process.
Few users also reported similar problems while trying to delete Windows.old directory. If you lot're not familiar, Windows.former directory is created after you install a new version of Windows.
Withal, it seems that y'all can't remove it manually due to this mistake. To ready the trouble you have to start Disk Cleanup and select Previous Windows Installation(s) from the bill of fare.
Afterwards doing that, you should exist able to remove Windows.one-time directory using Disk Cleanup with ease.
Speaking about old directories, you might also want to consider using a system optimizer tool. As a matter of fact, this software does only that: run extensive scans of your system and provide y'all with in-depth dashboards then you tin can hands take activeness where needed.
Install a PC optimizer software
When it comes to optimizing your PC like eliminating unwanted files and applications and cleaning the PC registry, a specific tool will keep your computer clean and safe.
These toolkits characteristic a thorough tuneup and cleaning suite that includes everything you lot need to go on your PC running smoothly. Security, maintenance, privacy, deep scans, and repair tools are among the functions bachelor.
With an optimizer program, yous can enhance your PC, exercise in-depth cleaning, and diagnosis to perform pretty much anything from removing junk data and broken shortcuts, fixing Registry entries, to disabling unnecessary services.
2. Empty the Recycle Bin
If you're getting this error message on your Windows 10 PC you might be able to fix it past emptying the Recycle Bin. This sounds like an unusual solution, but many users claim that emptying the Recycle Bin fixes the issue, and then feel free to endeavor it out.
To empty your Recycle Bin, do the following:
- Locate the Recycle Bin on your desktop.
- Right-click it and select Empty Recycle Bin.
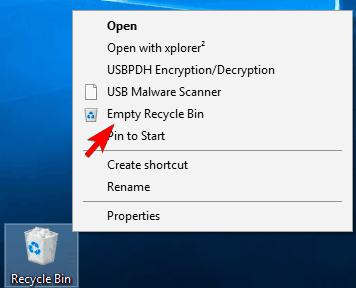
In one case your Recycle Bin is empty the fault message should cease appearing. Keep in mind that this isn't a permanent solution, and the problem might appear over again if you add files to the Recycle Bin.
To avoid adding files to the Recycle Bin you can use the Shift + Delete shortcut or press and concur the Shift key while clicking the Delete option.
In fact, few users claim that you can ready the problem only by permanently deleting the file using the Shift + Delete shortcut.
3. End Windows Explorer process and restart it
Another temporary solution that can aid you with this problem is to terminate the File Explorer procedure. Sometimes files tin become locked, but subsequently ending the File Explorer procedure, you should exist able to unlock them.
To practice that, follow these uncomplicated steps:
- Press Ctrl + Shift + Esc to open Task Director.
- After Job Managing director opens, select Windows Explorer and click on Restart.
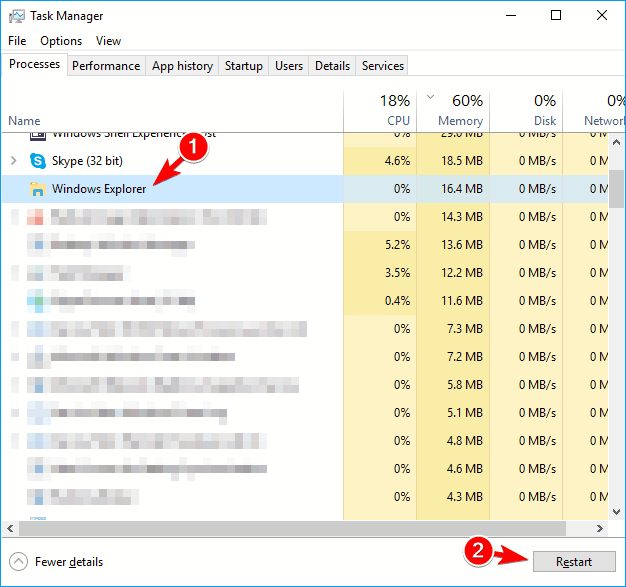
Windows Explorer will restart and your problem will be temporarily stock-still. You can also restart Windows Explorer past doing the following:
- Open Task Manager and navigate to the Details tab.
- Locate explorer.exe on the listing, select information technology, and click on the Cease Task button.
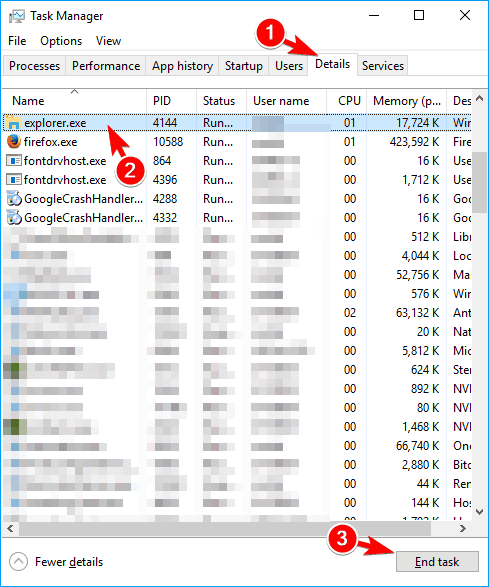
- Now become to File > Run new job.
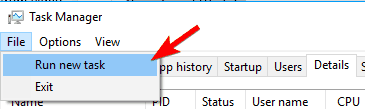
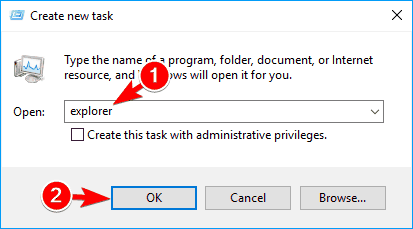
- Enter explorer and press Enter or click OK.
Restarting Windows Explorer isn't the best solution since it's quite possible that the problem will appear again, but it's a solid workaround so feel complimentary to endeavour information technology.
If you can end a chore in Windows x, take a expect at this step-by-footstep guide that will assist yous do information technology in but a couple of steps.
4. Edit your group policy
According to users, you can solve The action cannot exist completed because the file is open in another plan error only by modifying your group policy.
This is relatively simple to practise, and you lot can do it past following these steps:
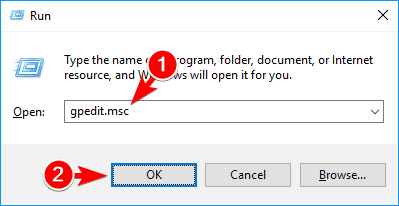
- Press Windows Key + R and enter gpedit.msc. Now press Enter or click OK.
- When Local Grouping Policy Editor opens, navigate to User Configuration > Administrative Templates > Windows Components > File Explorer. In the correct pane, double click the Turn off caching of thumbnails in subconscious thumbs.db files option.
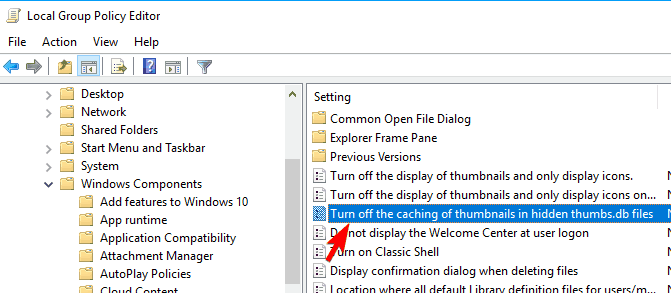
- Now select Enabled to enable the policy and click Apply and OK to save changes.
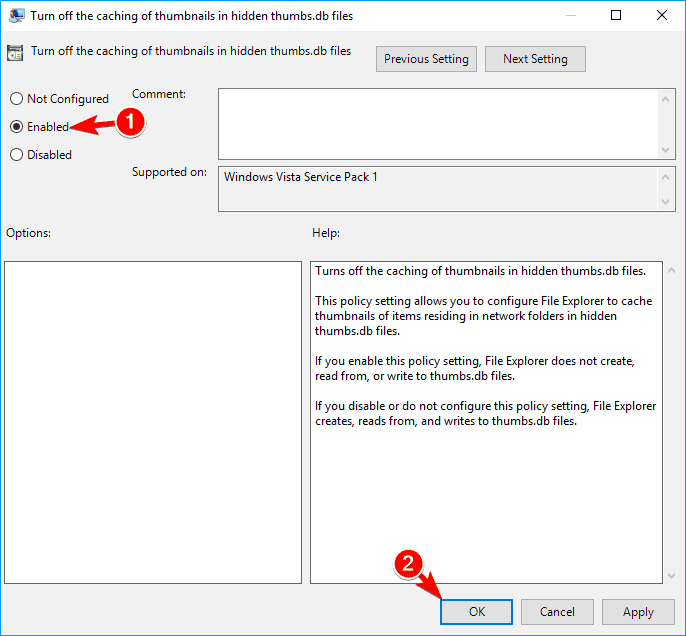
After doing that, all thumbnails will be disabled in File Explorer, merely the problem should be resolved completely.
If yous don't have the Group Policy editor on your Windows 10 PC, go it at present by following the piece of cake steps in this guide.
5. Disable the Preview panel
According to users, The action cannot be completed because the file is open in another program can announced if you're using the Preview panel.
Fifty-fifty though this feature is useful, it can sometimes crusade this error to appear. To fix the trouble users are suggesting disabling the Preview pane entirely. This is rather unproblematic and you can practise it by following these steps:
- Open up the File Explorer past pressing Windows Key + E shortcut.
- Now become to the View tab and brand sure that Preview panel isn't selected.
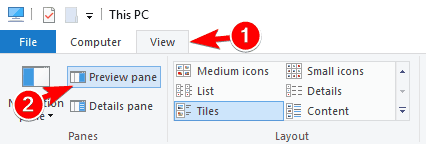
After disabling the preview panel you should exist able to change your files without whatever problems. If you want to disable the Preview pane quickly, yous can do so past using Alt + P shortcut.
This might be a workaround, simply it will cease the trouble from appearing, so exist sure to try it out.
half dozen. Disable thumbnails
Another way to solve this problem is to disable thumbnails entirely. This might not be the best solution especially if yous like to use thumbnails, but information technology might be a solid workaround until yous find a permanent solution.
To disable thumbnails, do the following:
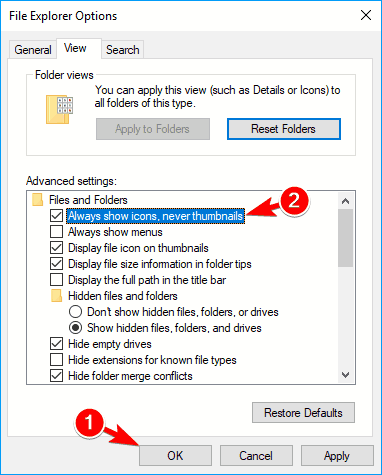
- Printing Windows Key + S and enter file options. Select File Explorer Options from the bill of fare.

- Go to the View tab and check Always show icons, never thumbnails selection. At present click on Use and OK to save changes.
Yous can also disable thumbnails by changing the Performance options. To do that, follow these steps:
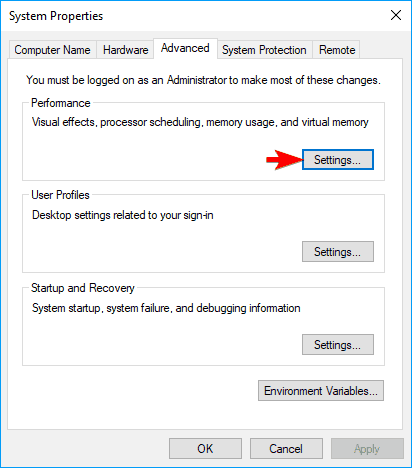
- Press Windows Key + Southward and enter avant-garde system settings. Choose View avant-garde system settings from the list.
- In the Functioning department click the Settings push.
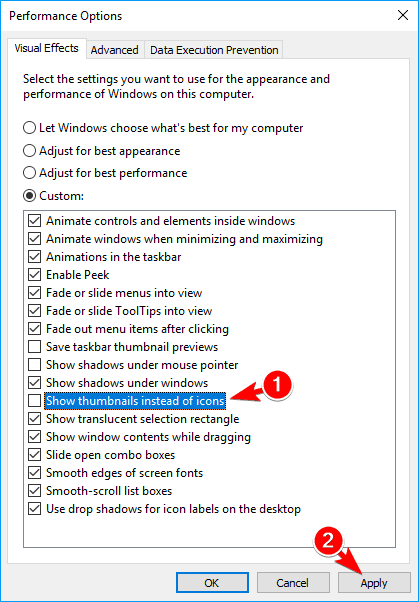
- Performance Options window volition appear. Locate Evidence thumbnails instead of icons option, uncheck it and click on Apply and OK to save changes.
After disabling thumbnails completely, cheque if the error message nonetheless appears.
If you want at any bespeak to restore thumbnails in Windows ten, check out this guide to learn how you lot tin do it quickly.
7. Modify your registry
If you lot're oftentimes getting this error bulletin, you might be able to ready it past making a few changes to the registry.
Continue in heed that modifying the registry tin can be potentially dangerous, and then use extra circumspection. To fix this problem you demand to do the following:
- Press Windows Primal + R and enter regedit. Press Enter or click OK.
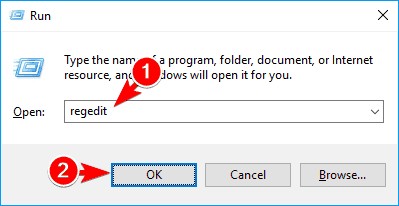
- When Registry Editor opens, navigate to
HKEY_CURRENT_USERSoftwareMicrosoftWindowsCurrentVersionExplorerAdvancedfundamental in the left pane. In the right pane, locate IconsOnly DWORD and double click it.
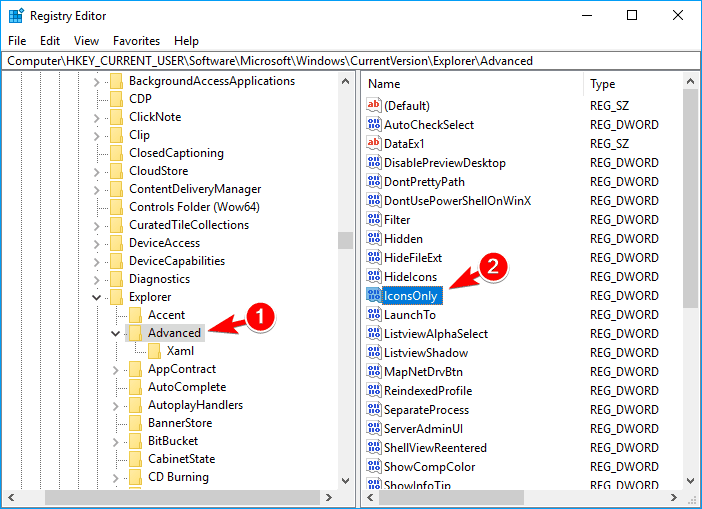
- Once the properties window opens, in Value information field enter 1 to show icons or 0 to show thumbnails. Afterward yous're done, click OK to salvage changes.
You tin also disable thumbnails by changing other values in your registry. To exercise that, follow these steps:
- Open Registry Editor and navigate in the left pane to the
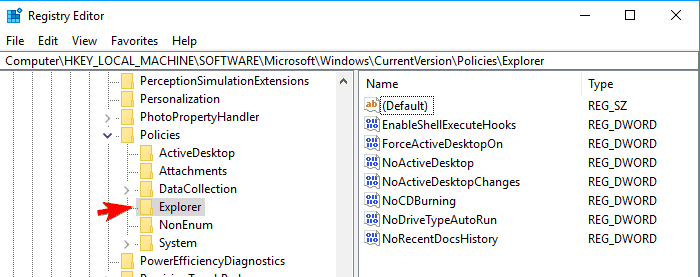
HKEY_CURRENT_USERSOFTWAREMicrosoftWindowsCurrentVersionPoliciesExplorerkey.
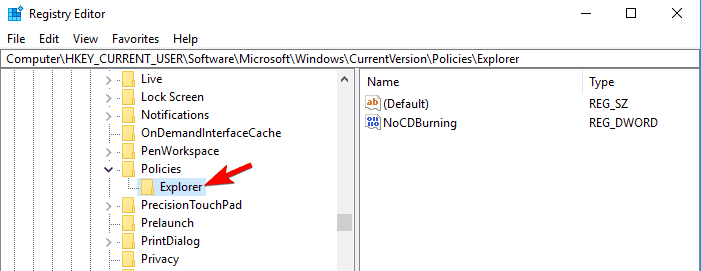
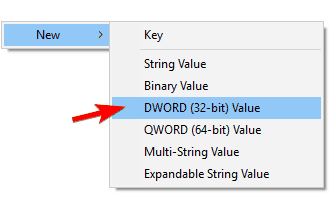
- Look for DisableThumbnails DWORD in the right pane. If the DWORD isn't available, you'll need to create it past right-clicking the empty space in the right pane and choosing New > DWORD (32-bit) Value from the carte du jour. Now enter DisableThumbnails as the name of the new DWORD.
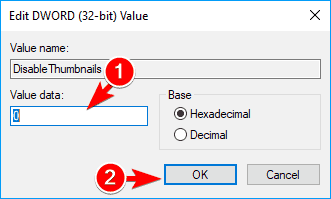
- Double click DisableThumbnails DWORD to open its backdrop. Set up the Value data to 0 and and then click OK to save changes.
- At present navigate to the
HKEY_LOCAL_MACHINESOFTWAREMicrosoftWindowsCurrentVersionPoliciesExplorercentral in the left pane. Look for DisableThumbnails DWORD and set its Value data to 0. If the DWORD isn't bachelor, you need to create it offset then change its Value information.
There's too another way to fix this problem using Registry Editor. To do that, follow these steps:
- Open up Registry Editor and in the left pane navigate to
HKEY_CURRENT_USERSoftwarePoliciesMicrosoftWindowscardinal in the left pane.
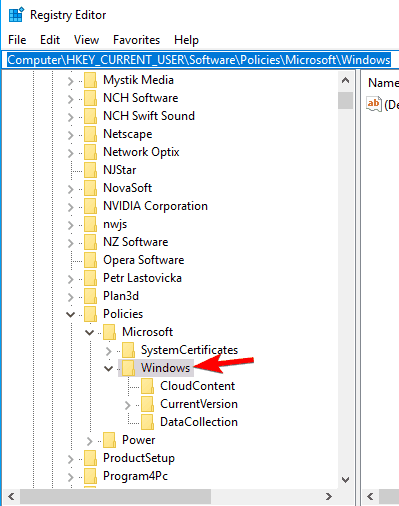
- Correct-click the Windows primal and choose New > Cardinal. Enter Explorer as the name of the new key.
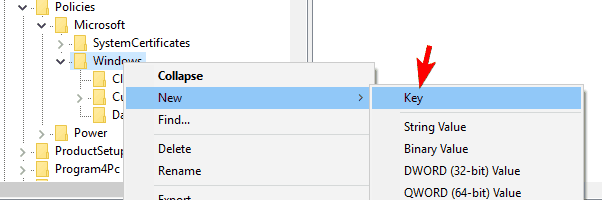
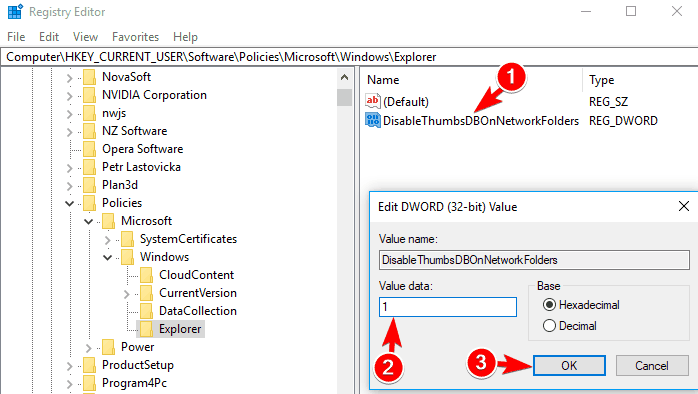
- Go to the newly created Explorer key and right-click the empty space in the correct pane and choose New > DWORD (32-bit) Value. Enter DisableThumbsDBOnNetworkFolders as the proper name of the new DWORD.

- Double click DisableThumbsDBOnNetworkFolders DWORD to open up its properties.
- Set Value data to i and click OK to save changes.
Later making the changes restart your PC and check if the problem still appears. Keep in mind that this solution volition disable thumbnails for the currently agile user account, so if y'all need to utilise thumbnails you lot might want to try a different solution.
8. Delete the TEMP folders
If you're ofttimes getting The activeness cannot be completed because the file is open in some other program mistake bulletin, you might be able to solve the problem past deleting the temp folders.
Windows stores temporary files in two temp folders, and sometimes temporary files can cause this trouble to appear. To fix the outcome, y'all need to delete those files manually.
This is relatively unproblematic and you tin exercise it by following these steps:
- Printing Windows Fundamental + R and enter %temp%. Press Enter or click OK.
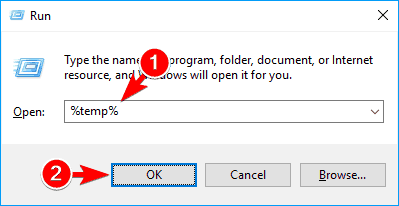
- When the temp folder opens, delete all files from it.
- Printing Windows Cardinal + R and enter temp. Press Enter or click OK.
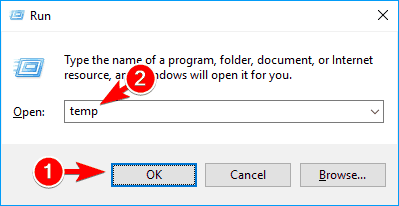
- Temp folder will now open up. Delete all files from it.
Some users claim that you need to edit your group policy as we showed you above later on deleting the files, and so exist certain to do that.
According to users, you can easily delete temporary files from temp folders by using CCleaner, so if you have this application installed you might want to use it.
9. Set up binder windows to open as dissever processes
According to users, you lot might be able to fix this problem by setting folders to open in new windows. To do that, follow these steps:
- Open up File Explorer Options. We showed you how to do that in Solution 6, so be sure to bank check it for more information.
- Navigate to the View tab and cheque Launch folder windows in a split process option. Click Apply and OK to save changes.

Subsequently making these changes all folders will open as carve up processes and you won't accept any more problems with this error message.
Few users claim that this option is actually causing the problem, so if Launch folder windows in a separate process pick is enabled, be sure to disable it and check if that solves the error.
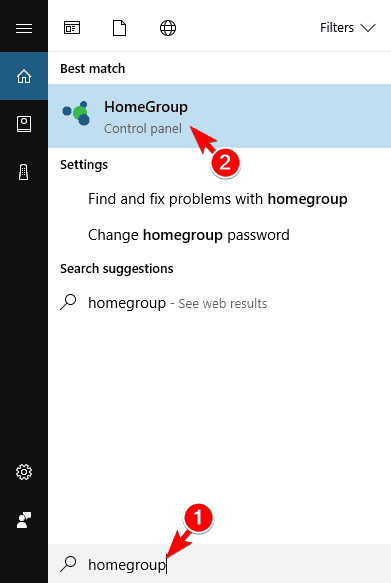
10. Disable the Homegroup
Few users claim that they stock-still this problem by completely disabling Homegroup on their PC.
Homegroups are useful for sharing files between computers in the network, but if you lot desire to fix the problem, you might want to try disabling the Homegroup characteristic. To do that, follow these steps:
- Press Windows Key + S and enter homegroup. Choose Homegroup from the menu.
- Choose Leave the homegroup from the bill of fare.
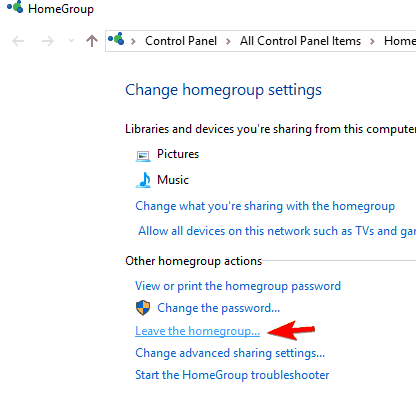
- A list of options will announced. Choose Leave the homegroup from the menu.
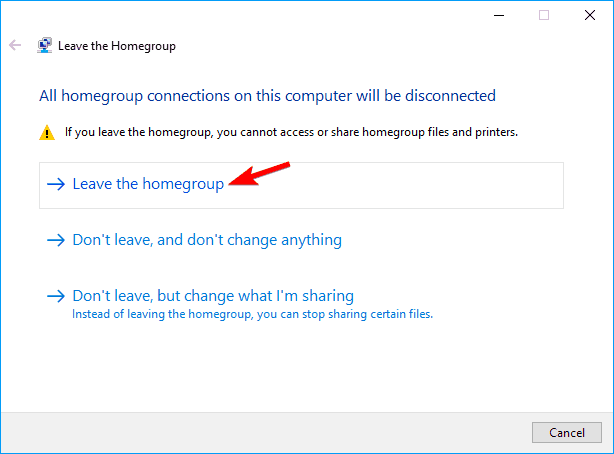
- If everything is in order, you lot'll see a confirmation message. Click the End push button.
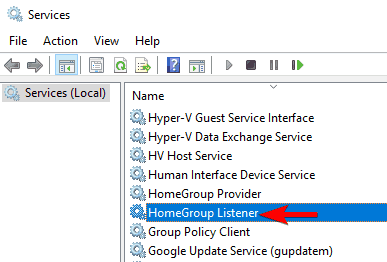
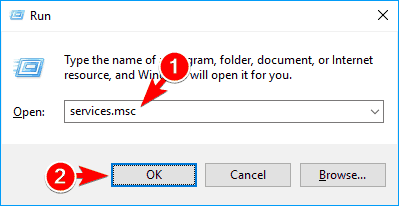
Subsequently leaving the Homegroup, you accept to disable its services. To practise that, follow these steps:
- Printing Windows Key + R and enter services.msc. Press Enter or click OK.
- Services window will now open. Locate HomeGroup Provider and double click it.
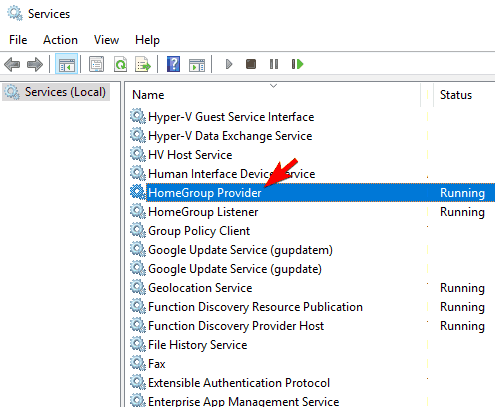
- When the Backdrop window opens, locate the Startup type field and set it to Disabled. At present click on Apply and OK to relieve changes.

- Locate HomeGroup Listener service, double click it and gear up its Startup type to Disabled.
Lastly, you just have to make few changes to the registry and you're good to go. To do that, follow these steps:
- Open Registry Editor.
- In the left pane navigate to
Computer/HKEY_LOCAL_MACHINE/SOFTWARE/Classes/CLSID{B4FB3F98-C1EA-428d-A78A-D1F5659CBA93}. - Create a new DWORD in the right pane and enter Organisation.IsPinnedToNameSpaceTree every bit its name. Now open up the newly created DWORD and set its Value data to 0. After saving the changes, shut Registry Editor.
Homegroup is a useful feature, but sometimes it can crusade this problem due to certain bugs. Disabling this feature isn't the best fashion to solve this problem, only information technology might be useful in some cases.
Few users claim they fixed the problem simply by leaving their current Homegroup, and so y'all might not have to disable the Homegroup service or brand changes to the registry to fix this problem.
11. Use Unlocker
If you lot tin't admission or delete certain files due to The action cannot be completed considering the file is open in another programme mistake, you might be able to fix it past using Unlocker.
This is a simple tool that will allow you to unlock any files that are locked past your system and allow you to remove them. The tool is uncomplicated to use and completely complimentary, so if you have any issues with this error, be sure to try Unlocker.
Another 3rd-political party solution that can help you fix this problem is Lockhunter. Few users reported they solved the problem by using this tool, so be sure to try it out.
12. Modify your folder view
Another useful workaround that can assistance you with this trouble is to alter your binder view. This is rather simple and y'all can do it by post-obit these steps:
- Open File Explorer.
- Go to the View tab and choose Small icons, List or Details from the menu.
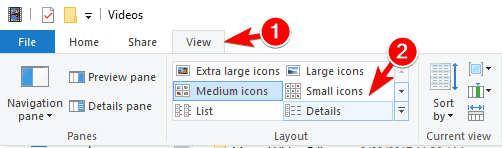
After doing that you should exist able to change the files from this directory without any problems. Since this is only a workaround, you lot'll take to echo these steps for every directory that is giving you lot this error.
xiii. Disable Windows Search
According to a few users, this trouble can be besides caused by Windows Search, and in guild to set it, yous need to disable this feature entirely.
Windows Search is a core component of Windows, and if you employ information technology often, you might want to skip this solution and try a dissimilar one. To disable Windows Search, do the following:
- Printing Windows Key + S and enter indexing options. Select Indexing Options from the menu.

- Indexing Options window will now appear. Click on Change push button.
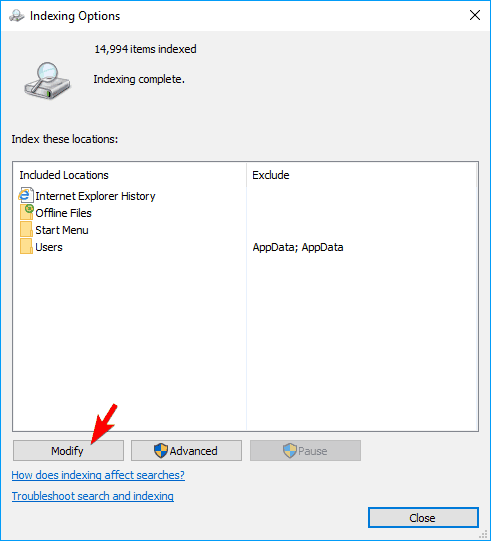
- Now y'all can disable indexing locations simply by unchecking them. After you're done, click OK to salvage changes.

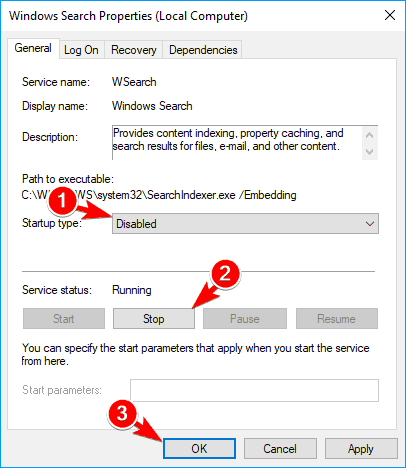
At present you simply demand to disable Windows Search service. To do that, follow these steps:
- Open the Services window. Y'all tin can do that by pressing Windows Cardinal + R and entering services.msc.
- Once the Services window opens, locate Windows Search on the list and double click information technology.

- Set the Startup blazon to Disabled and and so click the Stop push to stop the service. At present click on Apply and OK to salvage changes.
After disabling Windows Search the trouble should be fixed. Proceed in mind that past irresolute Indexing Options or past disabling Windows Search service you can cause issues with certain features.
If whatsoever problems occur, exist certain to restore everything to the previous land.
- READ Likewise: Here are the best Windows Search alternatives that you tin can use right now!
14. Open up and close your file
If you lot're unable to move a certain file due to The action cannot be completed because the file is open in another program message, you might want to try opening and closing that file.
This is a unproblematic workaround and past opening and closing the file you'll ensure that it'due south non open in whatever awarding. This isn't a permanent solution, and you'll take to repeat it with every file whenever this problem appears.
15. Use Safe Mode and Command Prompt
According to users, you might desire to attempt accessing your files using the Command Prompt. Users suggest inbound Condom Style and starting Command Prompt from in that location and using it to edit their files.
This is relatively unproblematic and y'all can exercise it by following these steps:
- Open the First Menu, click the Power button, press and concur the Shift primal and click on Restart from the menu.
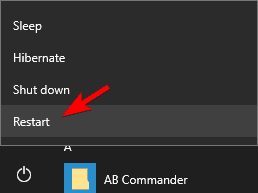
- Select Troubleshoot > Advanced options > Startup Settings and click on Restart button.
- Once your PC restarts a listing of options volition appear. Select Enable Safe Mode with Command Prompt from the carte by pressing the appropriate key.
- Once you lot enter Safe Way, Command Prompt will automatically start. At present y'all but have to use Command Prompt to navigate to the problematic file and modify it.
Continue in mind that Command Prompt is an advanced tool, and if you're not familiar with it you'll take to learn basic syntax before you tin can employ this solution.
Few users merits that you don't fifty-fifty have to use Command Prompt. But start Safe Style and find the problematic file and you should be able to modify it without any problems.
16. Perform the Clean boot
Sometimes 3rd-party applications tin interfere with your PC and crusade this and other errors to occur. In fact, some applications tend to start automatically with Windows causing the problem to announced equally soon as Windows starts.
To gear up the effect, you need to observe the problematic awarding. This is relatively simple and the best way to do that is to perform a Clean kick. To do that, follow these steps:
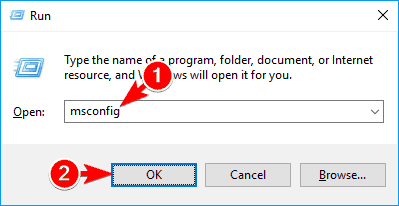
- Printing Windows Key + R and enter msconfig. Printing Enter or click OK.
- System Configuration window will at present appear. Get to the Services tab and check Hide all Microsoft services option. Now click on Disable all button.

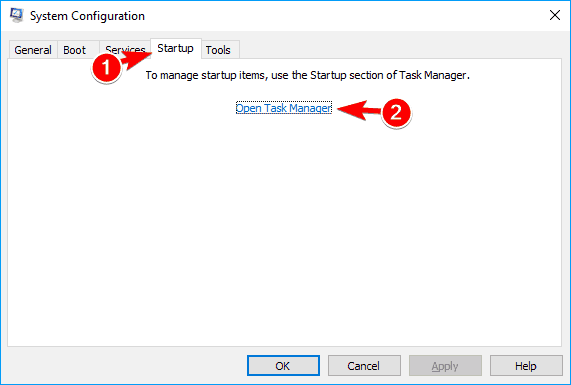
- Go to the Startup tab and click on Open up Task Manager.
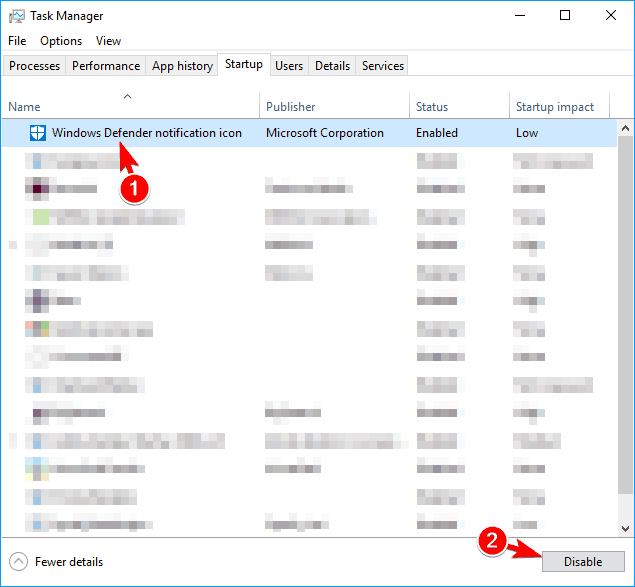
- List of startup applications volition now appear. Select the first entry on the list and click on Disable button. Now repeat the aforementioned steps for all entries on the list.
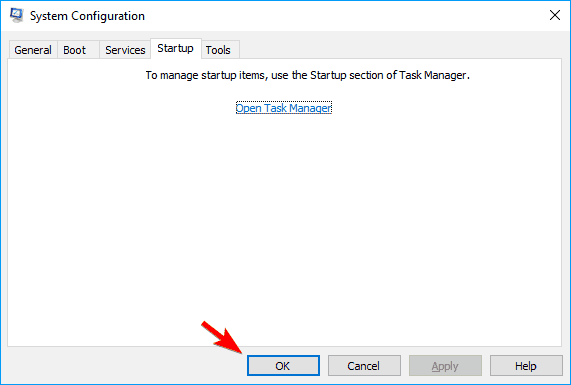
- Later disabling all startup applications, close Task Manager and go back to System Configuration window. Click Use and OK to save changes.
- Restart your PC or log out and log back in to your user business relationship to employ the changes.
Once your computer restarts, bank check if the problem however appears. Your figurer will now run only with default services and applications, and if the error doesn't announced it'due south almost certain that a tertiary-party awarding is causing it.
To find the problematic application y'all need to echo the same steps and enable startup services and applications ane past one until yous find the one that is causing this trouble.
Keep in mind that you demand to restart your PC later on enabling the application or service to apply changes. Once you notice the problematic application yous can keep it disabled, reinstall information technology, update it to the latest version or remove it from your PC.
17. Utilise a different PDF application
According to users, Adobe Reader tin can sometimes crusade this error bulletin to appear. To fix the trouble, you need to download a different PDF reader and prepare it as a default application for PDF files. After doing that, the problem should be resolved completely.
Few users besides claim that you lot tin can fix this problem simply by uninstalling Adobe Reader from your PC, so yous might want to effort that as well.
18. Utilize Optimize for option
According to users, you can set up this problem simply by using Optimize choice for your folders. Users reported having this mistake while deleting video folders, and according to them, they managed to solve the problem by using the Optimize for option.
To do that, follow these steps:
- Open the directory that holds the problematic files/folders.
- Right-click on the empty infinite inside the binder and cull Properties from the bill of fare.
- In one case the Properties window opens, become to the Customize tab and select the desired selection from the Optimize this folder for carte. Now click on Besides apply this template to all subfolders. Lastly, click OK and Apply to save changes.
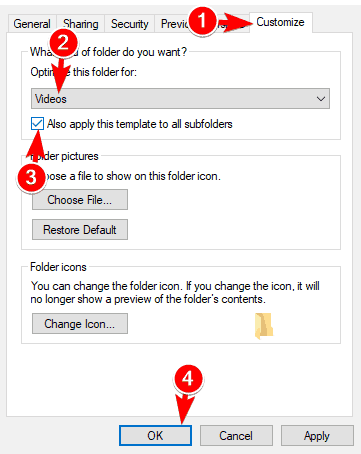
Later using Optimize for option, you should exist able to delete files without any issues. You lot might become a alarm while trying to do so, just yous should be able to circumvent it.
Yous might accept to effort optimizing your folder for unlike file types since it might accept you a few tries to observe the setting that works for you.
19. Use Control Prompt to remove Thumbs.db file
In many cases, the main cause for this trouble can be Thumbs.db file. The file is in accuse of storing your thumbnail enshroud, only sometimes these files can cause this and many other errors to announced.
To fix the issue, y'all need to remove those files from your partitions. This is relatively unproblematic and you can do it past post-obit these steps:
- Press Windows Primal + X to open Win + X carte du jour and select Command Prompt (Admin). If Control Prompt isn't available, experience free to use PowerShell.
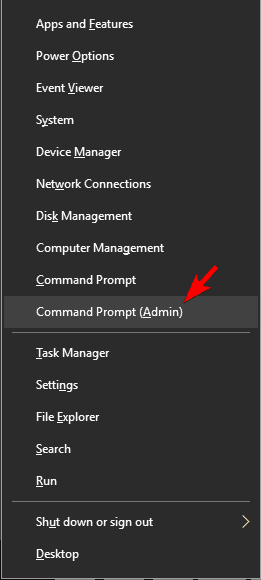
- When Command Prompt opens, y'all need to switch to the desired drive. To exercise that, merely enter Ten: and printing Enter. Be sure to supercede 10 with an actual alphabetic character that represents your division.
- Subsequently switching to the desired partition, enter del /ash /s thumbs.db and printing Enter to run the command. The command volition delete all thumbs.db files from your partition.
- Now you just have to repeat these steps for all other partitions on your PC.
Keep in mind that this solution doesn't require you to perform it on every sectionalisation, instead, you lot can perform information technology but on the i that is giving you this problem.
However, if y'all desire to completely stop this fault from appearing you might have to delete thumbs.db from all partitions on your PC.
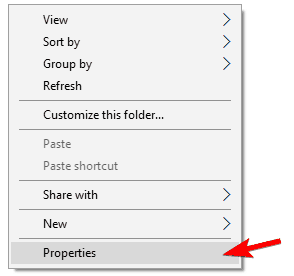
20. Stop sharing for the problematic folder
Sometimes this error message tin occur with folders that are shared with other users. To fix this trouble nosotros propose you to stop sharing for that folder and check if that solves the result. To do that, follow these steps:
- Locate the folder or file that is giving you this error message.
- Right-click the problematic file or directory and choose Share with > Stop sharing from the menu.

After stopping sharing for the problematic binder the outcome should be completely resolved and you'll exist able to motility, rename and delete your files without whatsoever problems.
21. Install the latest .Cyberspace Framework
Many Windows applications use .Internet Framework, and sometimes this trouble can occur if you don't take the necessary .Internet Framework installed.
Nevertheless, you can fix this problem simply by downloading .NET Framework from Microsoft's website. This framework is completely free, and in order to gear up the problem, you might have to install all versions of the framework and bank check if that solves the event.
22. Try to rename file or directory using the Control Prompt
According to users, they are sometimes unable to rename sure files due to The activeness cannot be completed because the file is open in another program.
However, you might exist able to fix the problem simply by using Command Prompt to rename the problematic file or directory. This is relatively unproblematic and y'all tin can do it by following these steps:
- Open Control Prompt as administrator.
- Now yous need to navigate to the problematic directory using the Command Prompt. Once yous enter the desired directory, enter rename problematic_file .txt new_name .txt and printing Enter to rename the file. Keep in listen that yous need to enter both file name and extension in order for the control to work. Alternatively, you lot can utilize rename c:path_to_problematic_file problematic_file.txt new_name.txt command instead. If you want to rename a directory, you lot need to navigate to its parent directory with Command Prompt and and so enter rename problematic directory new name .
Proceed in mind that this is an advanced solution and if you lot desire to apply information technology be certain to learn Control Prompt syntax beforehand.
If for some reason you're getting Access denied bulletin in Command Prompt, you might desire to try running it from Rubber Fashion as we showed you in Solution 15.
23. Change your security settings
If you lot're getting this mistake frequently, it might exist due to your security settings. Sometimes the problematic folder might lack certain security permissions causing the problem to appear.
To set the issue, yous need to modify your security settings past following these steps:
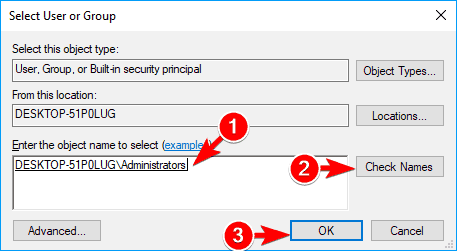
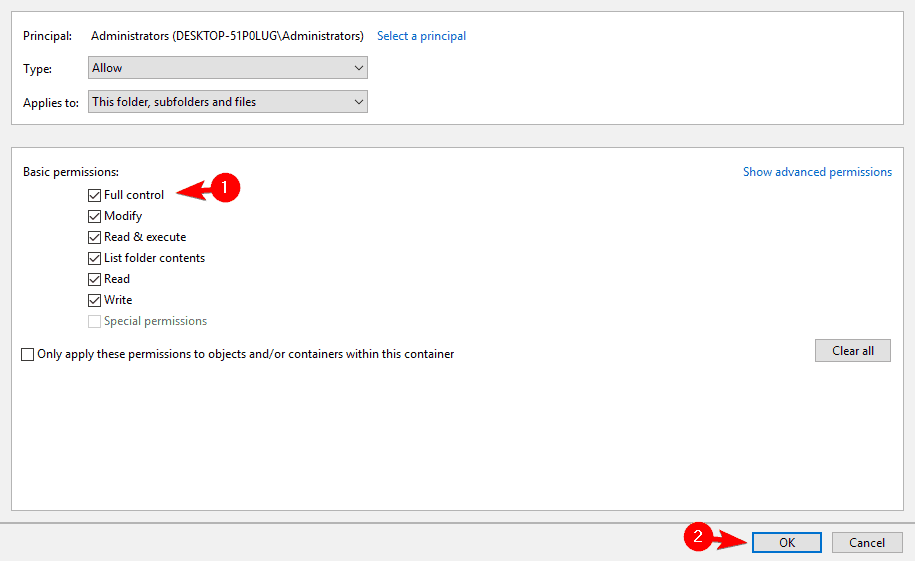
- Locate a working folder that doesn't have this problem. Be sure to utilise a non-system folder. Correct-click the folder and choose Properties from the menu.

- Get to the Security tab, check the listing of available groups and users and write it down.

- At present echo the same steps for the problematic binder or file. Once yous open up the Security tab bank check if any entries from Step 2 are missing. If and so, y'all need to add together them manually. To do that, click the Edit push button.
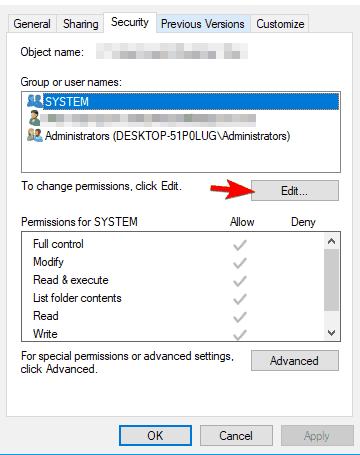
- Now click the Add button.

- Enter the desired user name or group in the Enter the object names to select the field and click on Check Names. If everything is in order, click on OK.
- Select the newly added user or group and check Full control in Let column. Click Use and OK to save changes.
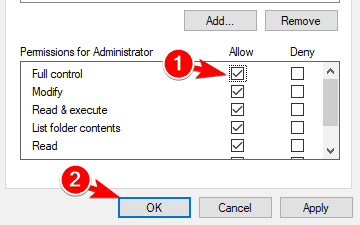
- Keep in mind that yous might accept to repeat these steps and add all missing users and groups from Step ii.
Some users are suggesting to just add your user account and grant it Total command over the affected directory. After doing that, the problem should exist completely resolved.
This solution is a bit advanced so you might not be able to perform it correctly if you're a basic user.
It's also worth mentioning that you shouldn't utilize this solution on system files and directories, so if you're having whatsoever problems with those, you might want to effort a different solution.
24. Change dllhost.exe security permissions
This mistake can sometimes occur due to bug with COM Surrogate procedure. This process is related to dllhost.exe, and you lot tin fix the problem past irresolute security settings for dllhost.exe. To do that, follow these steps:
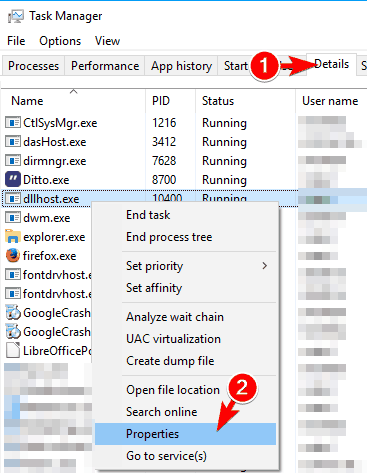
- Press Ctrl + Shift + Esc to open Task Manager.
- In one case Task Manager opens, navigate to Details tab. Locate dllhost.exe on the list, right-click information technology and choose Properties from the menu.
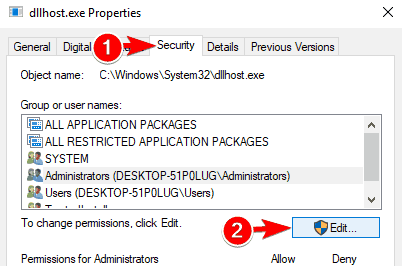
- Navigate to the Security tab and click on the Edit push.
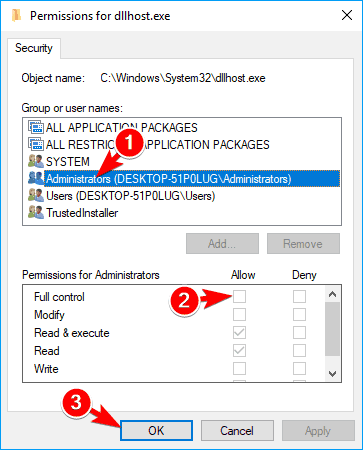
- Select Administrators from the list and check Full control in Let cavalcade. Click OK and Apply to save changes.
If you can't modify the security permissions for some reason, you might desire to effort ending COM Surrogate process. Few users claim that this solution worked for them, then feel free to effort it out. To end the COM Surrogate procedure, practise the following:
- Open Task Manager.
- Locate COM Surrogate in the list of processes, select information technology and click End Task button.
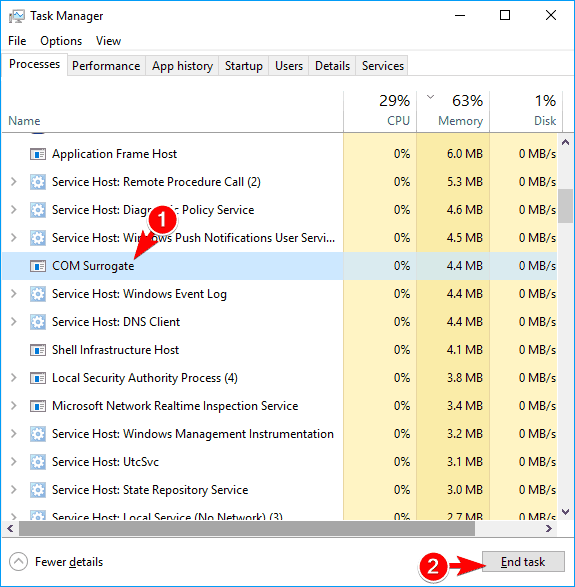
After ending the COM Surrogate process the trouble should be resolved. If the issue appears once more, you lot might take to repeat this process.
25. End Windows Explorer procedure and utilise Command Prompt to delete the file
You can sometimes avert The activeness cannot be completed considering the file is open up in another plan mistake by using Command Prompt. However, this upshot tin can likewise occur in Control Prompt.
To fix the problem, you demand to end File Explorer process and starting time Command Prompt while Windows Explorer is closed. This is relatively simple, and you can practise it past following these steps:
- Open Job Manager and end File Explorer process. For more than information on how to do that, check Solution iii.
- Later on ending File Explorer process, get to File > Run new task.
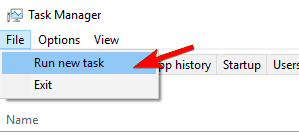
- Enter cmd and check Create this task with administrative privileges. Now click OK or press Enter.
- When Control Prompt opens, locate the problematic file or directory and remove it or edit it using the Command Prompt.
- After deleting the file, enter explorer.exe in Command Prompt to start Windows Explorer again.
As y'all can see, sometimes Windows Explorer can interfere with Command Prompt and cause this and other errors to appear. However, you should be able to avoid it by using this solution.
Keep in mind that this solution requires you to be familiar with basic Command Prompt syntax, so you might desire to larn a few bones commands before you endeavour it.
Several users merits that you lot don't even have to end Windows Explorer in order to delete the problematic file.
According to them, you only have to start Command Prompt with administrative privileges and apply the DEL /F /Southward /Q /A C:UsersUserNameDesktopFile.txt control.
Of class, be sure to use the correct path to the problematic file before running the command.
26. Use Process Explorer or Handle
If you're an avant-garde user, you can attempt to fix this problem by using Process Explorer or Handle. Process Explorer is similar to Chore Manager and it allows yous to see currently agile processes along with the list of files they're using.
Using this tool you tin can easily find the process that is holding your file and close it. Simply cull Discover > Find Handle or DLL choice from the menu and enter the file or directory name that is giving you this fault.
At present you lot'll run into the name of the process too as its ID so you tin can hands close it.
Another application that can help you fix this problem is Handle. This is a third-party command-line tool, and it's more complex than Process Explorer.
Afterwards you download this tool, you need to offset Control Prompt as an administrator and enter Handle64.exe > output.txt command.
Later doing that, output.txt file will exist created. Minimize Command Prompt and open output.txt file. Search for the problematic file on the listing and write down the HEX number next to information technology. This is the ID of your file that yous'll need to use for futurity steps.
Locate the parent row for your file and write downward its ID. This is the ID of the process. At present you simply have to become back to the Command Prompt and enter handle.exe -c your_file_id -p your_process_id command.
Be certain to replace your_file_id and your_process_id with the correct HEX values.
If yous perform this procedure correctly you lot'll successfully release the file without catastrophe its process. This is an advanced solution, then if you're a basic user you might experience some difficulties while performing it.
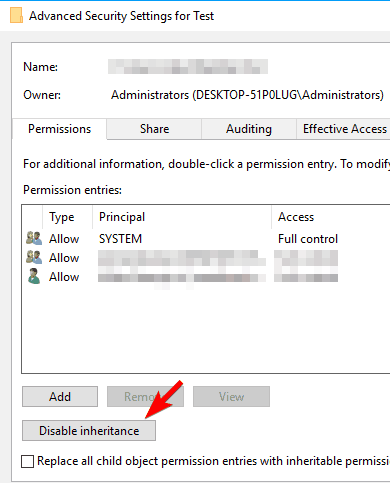
27. Disable inheritance for the problematic file/directory
Co-ordinate to users, problems with inheritance can cause this and many other errors to appear. To fix the upshot, yous need to disable inheritance and check if that solves the trouble.
Keep in mind that disabling inheritance for system files and directories can cause problems, and then you might want to use a different solution if you're having this trouble with system files. To disable inheritance, do the following:
- Locate the problematic file or directory, right-click it and choose Properties from the menu.
- Navigate to the Security tab and click on Advanced.
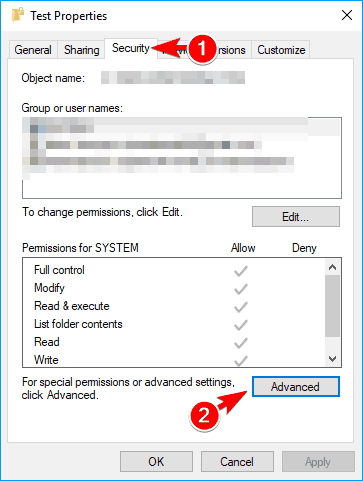
- Click on the Disable inheritance button.
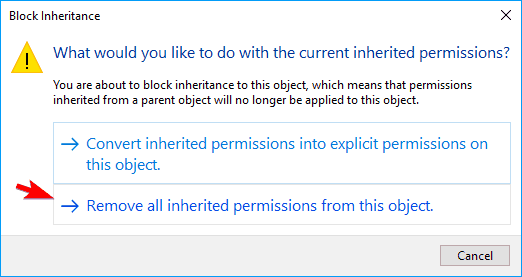
- Cull Remove all inherited permissions from this object.
- Now click Enable inheritance push and then click on Add.
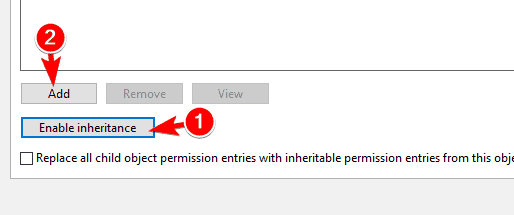
- Click on Select a principal.
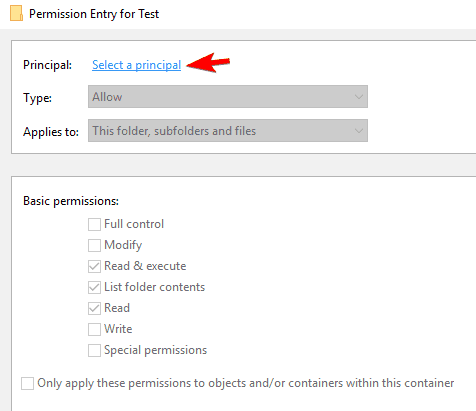
- Enter your user name in the Enter the object name to select and click Check Names. If everything is in social club, click OK.
- Check the Full control choice and click OK.
- Salvage changes.
After making the aforementioned changes you should be able to delete files and folders without any bug. Keep in mind that this is an advanced solution, so you should use it only for non-system files and directories.
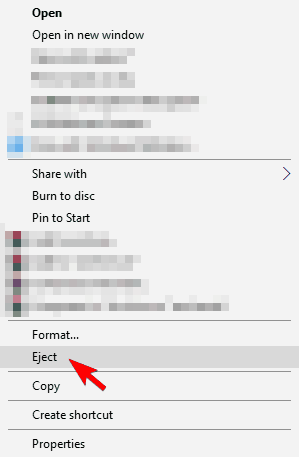
28. Unmount all drives
According to users, this problem tin occur with applications such equally Magic ISO. Users merits that they can't delete ISO files due toThe activity cannot exist completed because the file is open up in another program error bulletin.
To fix the event, yous just demand to unmount all drives from Magic ISO. To practice that, follow these steps:
- Open Magic ISO and go to Tools.
- At present navigate to Virtual CD/DVD ROM > Unmount All Drives.
Alternatively, y'all can unmount an ISO image correct from the This PC. ISO images work as standard optical drives and you tin can easily eject them.
To exercise that, simply open up This PC, locate the ISO drive, right-click it, and choose Squirt. Go along in listen that you'll have to echo these steps for all mounted ISO files.
Few users claim that y'all can set the problem simply by mounting the ISO file and unmounting information technology from the application. According to users, MagicDisk tin sometimes show your ISO file as mounted when information technology actually isn't.
To prepare the outcome, simply mount the file manually and then unmount it. This is a small bug, but as you tin encounter, it can interfere with your PC and crusade this trouble to appear.
Subsequently doing that, all your mounted ISO files will be released and yous'll exist able to delete them without any problems.
29. Use Task Manager to close the problematic procedure
Sometimes this error message volition tell y'all which program is holding your file. For example, many users reported this fault while trying to remove Word documents.
If you're having a like problem, you lot need to start Task Manager and cheque if the problematic application is running in the background. If and then, end its procedure and the trouble should be completely resolved.
30. Rename the file
According to users, if you tin't delete a specific file you might exist able to circumvent the problem only by renaming that file. To fix the problem, you just have to locate the problematic file and rename it.
Later doing that, restart your PC. Once your PC restarts, attempt to delete the file over again. If for some reason you can't rename the file, restart your PC and try to delete or remove the problematic file.
31. Utilize Ubuntu Live CD
If yous're often getting this fault message you might be able to solve it but by using Ubuntu Live CD. Yous can use whatsoever other version of Linux if you desire, only due to simplicity, we recommend using an Ubuntu distribution.
But download the Ubuntu ISO file and create a bootable USB flash drive or Live disc. Now yous just demand to boot from the USB flash drive or optical disc to commencement Ubuntu.
After doing that you should be able to find the problematic file with ease and delete it.
32. Remove the metadata using the EXIFtool
According to users, sometimes metadata of your files can crusade this problem to appear. To fix the event, y'all demand to remove all metadata from the problematic file.
Users reported that they stock-still the problem by using EXIFtool. This is a control-line tool, so you might take to acquire its syntax before you can successfully remove the metadata.
After you remove the metadata, you'll be able to delete the file without any problems.
33. Modify the owner
Sometimes you can fix this trouble simply by irresolute the possessor of the file or directory. Keep in mind that irresolute the owner for system files can cause sure issues, so utilise this solution just for not-system files.
To alter the possessor, do the following:
- Right-click the problematic file or folder and choose Properties.
- Navigate to the Security tab and click on the Advanced button.
- Y'all should now see the owner of the file. Click the Change pick next to the owner name.
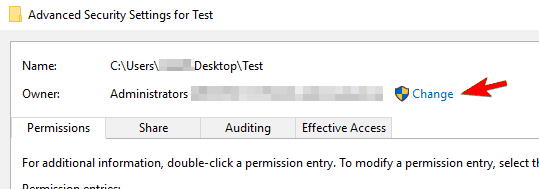
- Select User or Group window volition announced. Enter your user proper name in the Enter the object name to select field, click Cheque names, and OK.
- Now check Supersede owner on subcontainers and objects option and click Apply and OK to save changes.

Afterward doing that you should exist able to alter the file or directory without any problems.
If you're interested in how to take ownership of a file or a folder in Windows x, check out this amazing guide.
34. Try to re-create another file
One little workaround that might help you with this problem is to but copy some other file. To do that, just locate whatsoever other file, right-click it and choose Copy from the menu.
After doing that, locate the folder or file that y'all couldn't delete previously and try to delete it again.
Past copying another file y'all'll release other files from File Explorer and that will allow yous to delete them. Keep in listen that this is just a workaround, so you'll accept to repeat it for all affected files.
It's as well worth mentioning that this isn't a universal solution significant that this workaround might non be able to fix the problem in all cases.
35. Make sure that the file isn't prepare to read-only
Sometimes this mistake bulletin can appear if you're trying to modify a file or directory that is set to read-just mode. To fix the issue, you demand to disable read-only way by following these steps:
- Locate the problematic file and right-click it. Choose Properties from the menu.
- Become to the General tab and in the Attributes section make certain that the Read-just option isn't checked. If the choice is checked, uncheck it and click on Apply and OK to relieve changes.

After making these changes you should be able to alter the file or folder without any bug.
36. Be certain that your Windows is up to engagement
In some cases, this error message tin can be caused past a certain bug in Windows 10. Most bugs are addressed via Windows updates, but if you still have this issue be sure to check if your system is up to date.
By default, Windows x automatically downloads the updates, but sometimes you might miss an important update. Of form, you can e'er check for updates manually by doing the following:
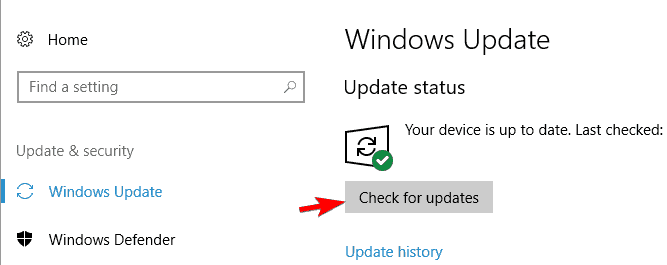
- Press Windows Key + I to open the Settings app.
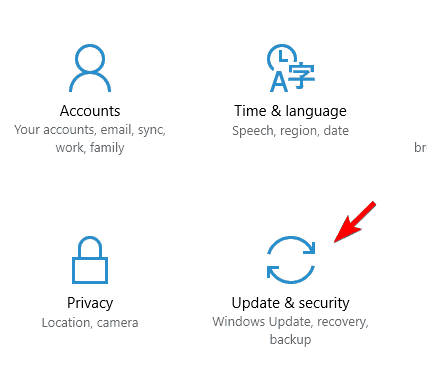
- When the Settings app opens, go to the Update & security section.
- Now click on Check for updates button. Windows will now cheque for updates and download them in the background.
If you're having trouble opening the Setting app, take a wait at this article to solve the issue.
Later on you update Windows to the latest version the problem should be completely resolved. If your system is already up to date, so you'll have to employ a unlike solution to fix this problem.
The activeness cannot be completed considering the file is open in another plan fault bulletin can cause many bug on your PC. This mistake will preclude you from accessing or removing certain files, but yous should be able to fix it past using one of our solutions.
If you have whatever other questions, don't hesitate to go out them in the comments section beneath and we'll exist sure to bank check them out.
Oft Asked Questions
![]()
stricklandmostaks98.blogspot.com
Source: https://windowsreport.com/action-cannot-be-completed-because-file-open-another-program/
0 Response to "Sharepoint Is Open in Another Application Please Close It and Try Again"
Post a Comment